Networks Wireless Setup for Windows 8
ETSU wireless access points are available to ETSU students, faculty, and staff. If you have a wireless adapter (wireless card) in your computer, you will be able to connect to the ETSU network via a wireless connection. Security for all ETSU Wireless Access Points is enabled by PEAP (Protected Extensible Authentication Protocol).
If you are trying to connect to an ETSU wireless access point with your personal computer, please use the following instructions. These instructions are presuming that Windows is controlling the wireless card. If your computer is using a specific program to control wireless connections, you can use the settings that are provided here to try to configure the program. ITS cannot provide any specific instructions for setting up a wireless connection for any wireless configuration programs that may have come with your machine.
NOTE: We have instructions on how to remove ETSU from your computer at the bottom of this page.
- The first thing is to get to Control Panel. If you're not sure where that is, you can either enter in Control Panel into the search bar on the Start screen, or your can go to the second page of the Start screen (the one with all of the small icons) and you'll probably find it on the far right side.
-
Once you get to Control Panel, choose Network and Sharing Center. If your Control Panel is showing things in Category view, click on Network and Internet and you'll find Network and Sharing Center there. When you get there, you should see an option that says Set up a new connection or network.

-
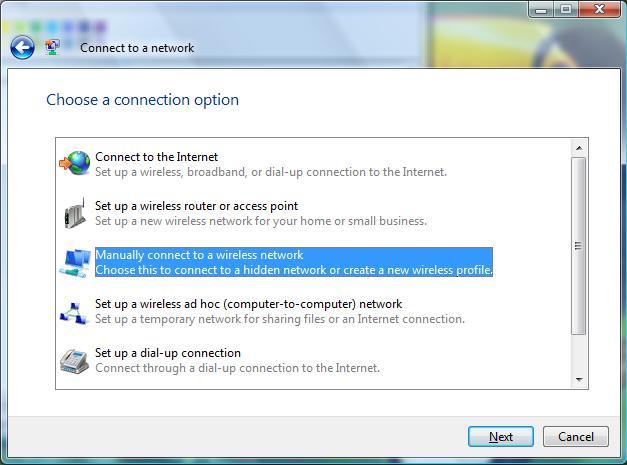
Choose the Manually connect to a wireless network option and then click on Next.
-
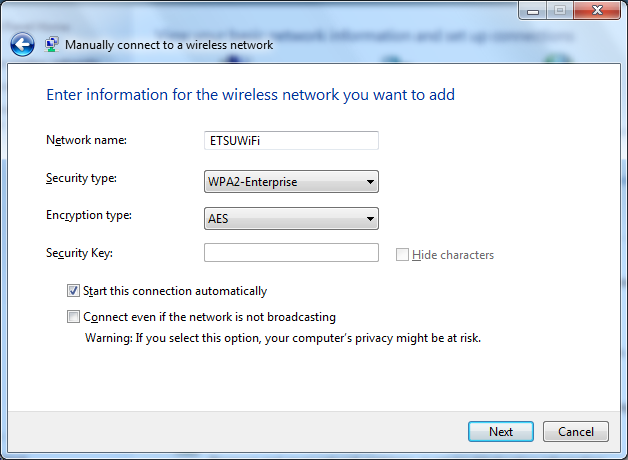
Type in ETSU for the Network name, choose WPA2-Enterprise for the Security type, and the Encryption type should be set to AES. Leave the Security Key/ Passphrase field blank. Be sure that the box labeled Start this connection automatically is checked. Click on Next.
-
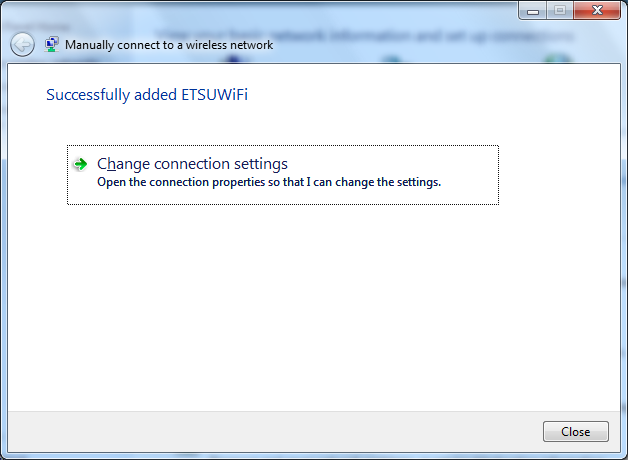
You'll get a screen that says that it successfully added ETSU. At this point, you need to click on Change connection settings. When the next screen comes up, click on the Security tab.
-
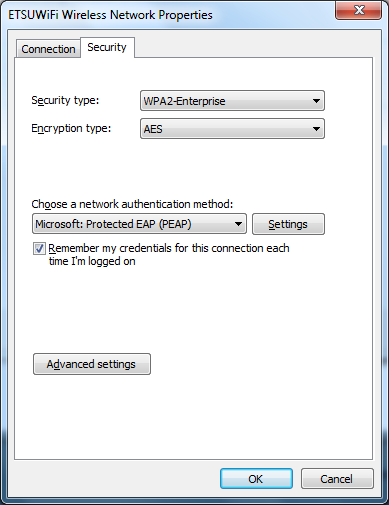
On this screen, be sure that the Security type is set to WPA2-Enterprise and that the Encryption type is set to AES. In the box under Choose a network authentication method:, be sure that it references "Protected EAP (PEAP)". When those are set, click on the Settings button.
-
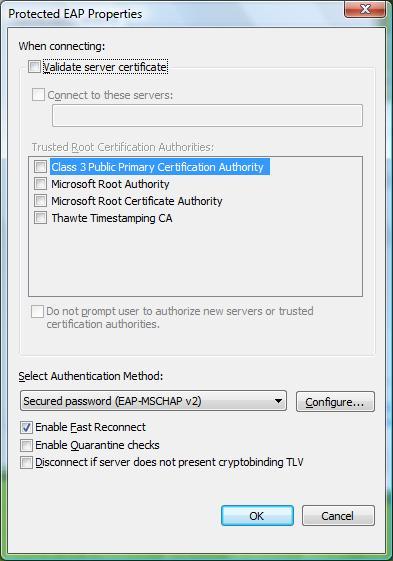
On this screen, you need to uncheck Validate server certificate. Ensure that the Select Authentication Method is set to "Secured password".
-
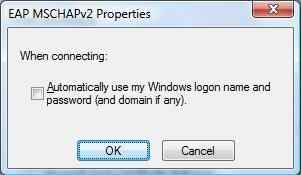
Next, click on the Configure button to the right and uncheck the box as shown below, then click on the OK button.
-
Click on the OK button to get out of the Protected EAP Properties screen. On the ETSU Properties window, click the button near the bottom labeled "Advanced Settings."
-
Check mark the box reading "Specify authentication mode" and change the drop-down value to "User authentication." The settings should appear similar to the picture shown here:
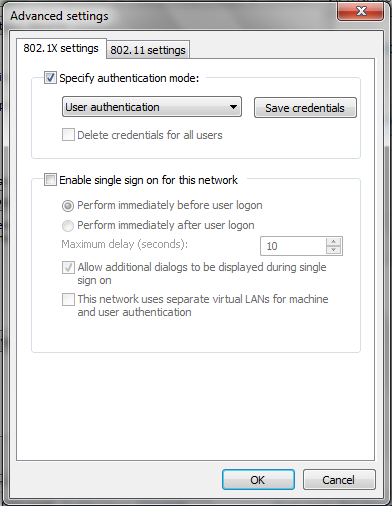
Click OK, then click OK again to get out of the ETSU properties screen. -
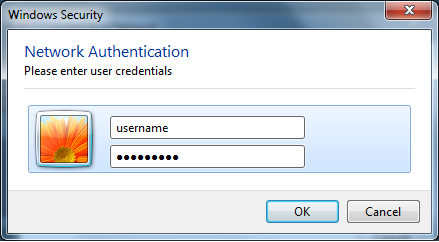
In the lower right-hand part of the screen near the clock, you should get a notification bubble like this:

Click on that bubble to get the login prompt to appear. -
At this screen, simply enter your ETSU username and your password. Click on the OK button.
-
After a few seconds, your machine should be connected to the network.
Removing ETSU

From the right side of the screen, swipe to the left to bring up the Charms menu. For non-touch machines, hovering the mouse pointer in the upper-right corner of the screen usually causes the Charms menu to come up. After that, tap on the Settings button at the bottom.
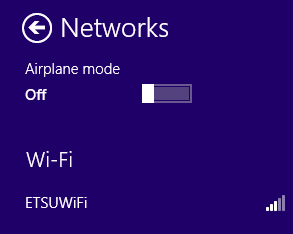
- After you tap on the icon for the wireless networks, ETSU should show up if you're
within range of the wireless network and if your wireless card is turned on and enabled.
Also, ensure that "Airplane Mode" is turned off. When you see ETSU listed, right-click
on it (or press and hold for a couple of seconds on touch-enabled systems) and choose
"Forget this network". This should remove all profile settings in case ETSU needs
to be added back to the computer.
If you have any questions, feel free to contact the Help Desk.