Electronic Forms
Register for an upcoming Dynamic Forms Training/Workshop
These training/workshops will happen every First Tuesday of each month.
-
Basic User Guide
When a basic user (student, faculty, parent, etc). log into Dynamic Forms they typically will be directed straight into the form they are requested to complete.
Basic Knowledge of Dynamic Forms (Only Admins)
-
Login/Dashboard
Click here if it's your first time loging in to Dynamic Forms
Login to Dynamic Forms using your ETSU email address Login Here
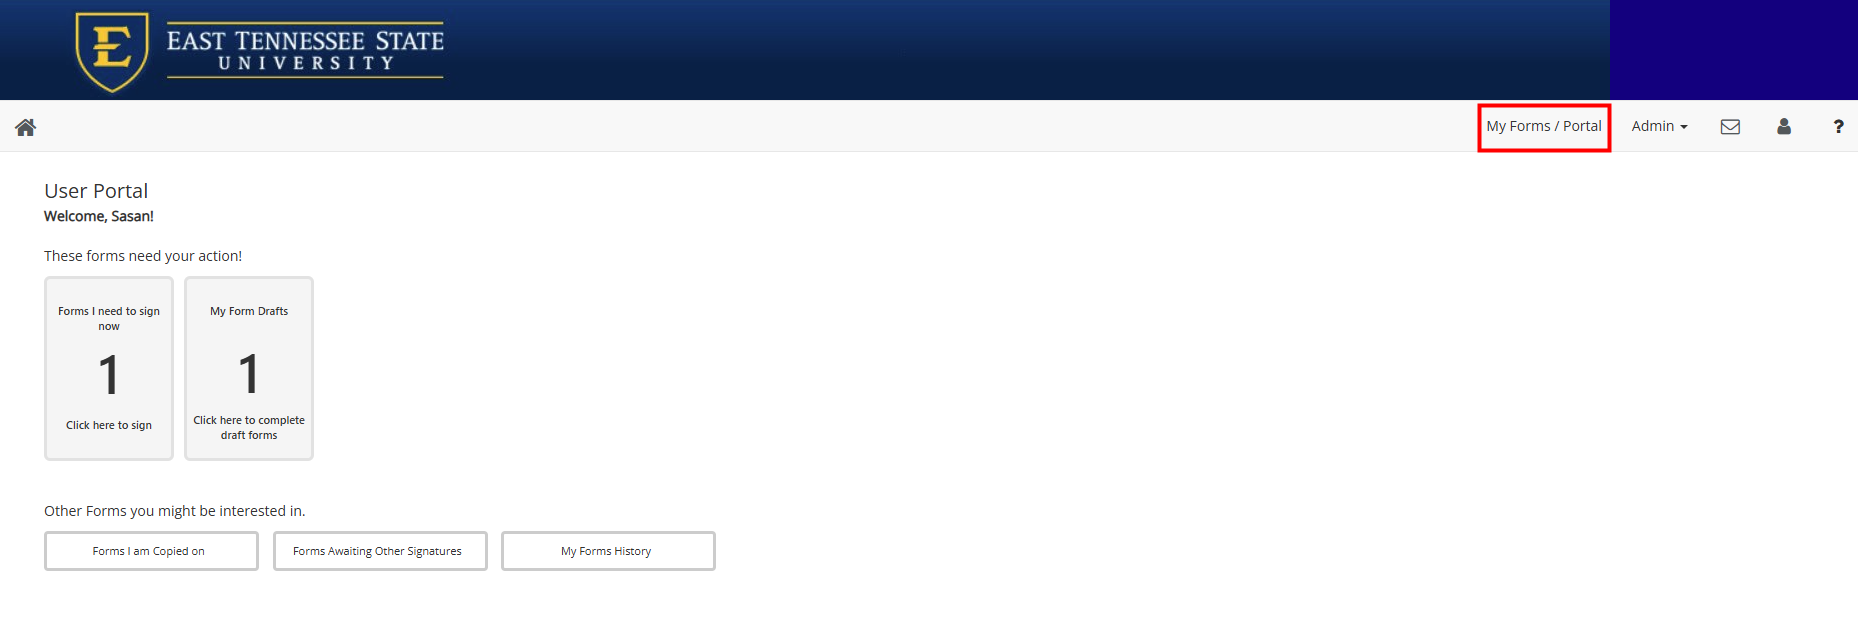
You will see the similar window after loging in to your account:
By clicking on "My Forms" you can see pending/draft forms, forms you have been copied on and the forms history:
All of forms display with the following options:
• Edit Form Template – Users can update basic items such as form name
• Activate / Deactivate – Allow users to take forms offline
• Copy Form Template – Users can copy any existing form
• URL Instructions – Provides users embedding URL
• Delete Form Template – Deletes form from org unit
• Fill out Form – Users can view the form or fill out should they choose
Form Administers Support Contact: Sasan Ahovan ahovan@etsu.edu Tell: 423-439-8247
*Note: When a form is active and has submissions (Reject / Multi
/Pending / Processed / Archived) the ‘Edit Form Template’ option is not available. To continue editing a form you will need to clear out all forms before the option to edit will be available or copy the form to update and make the updated form active. Make sure that you deactivate the original.
Multiple / Pending / Processed / Archived Signatures - Shows
how many forms are at each stage of the process. The numbers in each column link
users to a list of all submissions in each stage
Add New From Template – Users can start a new form. -
Setting Up a New Form (Only Admins)
After you click on the new form button on the top, the following screen will pop up:
Give your form a name (You can change the name latter if you wanted), then choose your organization if you have access to more than one, and finally click on "Add New Template" button.
After that you will see the following window:
You can learn more about each of those tabs here:
-
Name/Type
Name – This is the name of the form. This field does not contain any character limitations; however, it should describe how the form is used.
Description – This is a description of the form. This provides an overview of the form’s purpose and objectives. This field does not have any character limitations and is not a required field.
Esign Requirements – This field lets you choose between no signature, single signature, and multiple signatures depending on the type of form your designing.
Duplicate e-signature check – If you choose single or multiple signatures for your form you can then choose the following options: ignore duplicate submissions, prevent duplicate submissions or warn the user. This allows for blocking or allowing people to submit a form more than once.
If you choose warn the user in that field you will get two more fields to complete. How long do you want to warn the user and duplicate e-signature message. You can pick a few options for how long do you want to warn the user if they submit a duplicate form and present the user with a message before they actually submit the form.
Custom Opt-Out Information – This enables users to input a custom message that will be displayed to the user when presented with the option to opt out of e-signing the form and instead choosing to opt out and print. If left blank, default text will be displayed.
Custom Confirmation Email - This will allow you to send a custom confirmation email to each participant letting them know that they have successfully submitted the form.
Show the Form Timer – This option allows the form designer to decide whether or not the form timer will display when the user is filling out the form. The timer is an indication of when the user’s session will time out. The timer is a security feature that counts down 45 minutes per page. At 2 minutes, Dynamic Forms asks if the user would like to continue. If no answer is received, the user will be logged out.
Show Welcome Screen – This option allows the form designer to decide whether or not the user will see the Welcome to Dynamic Forms screen, which gives the user the option to visit their pending forms and forms history before beginning to fill out the form.
Use Recaptcha Verification – You can require users to complete a ReCaptcha challenge when submitting the form to ensure forms are not submitted in an automated fashion.
Automatic Activation - This will allow you to set the date/time range of how long a form will remain active. If there is no information in these fields, the form will need to be activated/deactivated manually.
-
Custom Text
The Custom Text tab will contain fields that allow you to customize the Inactive Text and if your form is a "No Signature" or a "Single Signature" form, it will also allow you to customize the Confirmation Text on the form.
Inactive Text
The Inactive Text will be what is displayed on the screen when a form is set to inactive. To deactivate a form, you can do so on the admin home page by clicking on the Action dropdown next to the form you want to deactivate and click "Deactivate this form."
Here you can customize the message that the form user will see. Typically, schools include their logo along with a message that says something like "Sorry, this form is currently unavailable."
Confirmation Text
You will only see the Confirmation Text option in this tab if you are building a "No Signature" or a "Single Signature" form. The Confirmation Text is the message the form participant will see upon completion of the form. Because "Multiple Signature" forms allow you to customize the confirmation text for each participant, this option is accessed through the participant's properties menu within the Participant tab.
Typically, you'll see the school logo along with a thank you message to the form user for completing the form.
-
Carbon Copy (CC)
There is a Carbon Copy (CC) option available in Dynamic Forms that allows you to CC individuals who were not participants on the form, and also were not listed in the Admin Notification section of the form designer. These specified individuals will be emailed a link to view an HTML copy of the form submission (they cannot edit or sign the form). They will also be able to later review these CC’d forms in a new section within the Admin dropdown menu.
If a new form template is created with eSign Requirements as “None” or “Single Signature,” a Carbon Copy tab will appear in the form designer
Last Updated By – The last person to update the form (or any elements within it).
Start Designing – Takes the User to the Form Designer page.
In this Workshop I've covered most of the topics above: (you may need to login to see the workshop)
Helpful Documents:
Basic Form Guide
Advanced Form Guide -
-
Building Your Form (Only Admins)
Once a Form Administer creates a new form, they will be taken to the form’s
configuration page. The forms configuration page includes the form designer.How to Add a Form Page Item:
Once you've accessed the form designer, adding a new form page item is as simple as dragging and dropping the form item you want to use on the form to its desired location. There are several different form item types to choose from and you can reference our help documents/videos for more information about each form item.
Naming Your Form Items:Each form item that you add to your form will require a form item name. If you are creating a first name field, it's recommended to name that field something similar to either "FirstName" or "FName" as that will allow you to easily understand what data that field is collecting. Form item names need to begin with a letter and cannot contain any spaces or special characters.
NOTE: For each form item that collects data (e.g. Short Answer, Choice List, Long Answer, etc...), you can set those fields as required fields by clicking on the "Required?" checkbox within each field.
Designing Forms with Multiple Pages:To create a new page, simply click on the green "+" symbol next to the "Pages" label. This will add a new page to your form. To delete pages from your form, you can click on the trashcan symbol underneath the page number.
Editing existing form:
-
Good to know
If using Single Sign On add this prefix to the url in the url Instructions under Actions: https://webapps.etsu.edu/DynamicForms?targetURL=
Dynamic Forms are mobile friendly by default! When a form is viewed on a mobile device the form text and fields display in a mobile friendly format.
When creating longer forms - The form timer resets with each new page of your form. By breaking your form up over multiple pages you can extend the time limit to fill out each form by 45 minutes with each new page. Alternatively, by making your visitor login to complete a form they are given access to save their progress and return to your form at a later date.The "∅ " icon you see next to some of the forms indicates that particular form template is using Confidential fields. That means the form designer at your school created those templates so that certain fields are hidden from particular form participants. When a form template has ANY Confidential fields, the participants on that form cannot access it from their Forms History or Pending Forms page. Example:Let's say you have a "Grade Appeal Form" that's started by a student, and then it goes to a Administrator who reviews the request to approve or deny the grade appeal.
The school may not want the student to be able to go back into that form and see the decision or any notes that Administrator left on the form (i.e., the reason for the request being denied, etc).
So they mark those fields as Confidential, which restricts the student from seeing them on the form and also prevents them from going back into their account to look at the PDF showing those Confidential fields. -
Common Issues
Login Issues?
If you are trying to login to sign a form or access your account and it says your login information is incorrect, most likely you are not using the SSO login and you are trying to login as a regular non ETSU user! To login correctly you need to click on the right SSO link which is at the top this page, and you should see the ETSU logo displayed in the login window.Can't Access a Form?
If you have received an email to complete a form but you get an error "page expired" or your login information is incorrect? To resolve this you will need to login to your Dynamic Forms dashboard using the SSO link first and then open the link in the same browser that you are logged in.
Another way to access a form to complete is to login to your dashboard, click on "My Forms", Pending/Drafts and there you can click on "Action" to complete any incompleted form.Can't find a Form in Dynamic Forms?
If you are looking for a specific form to fillout and submit you will NOT be able to find it in Dynamic Forms dashboard, you will need to find the link to the specific form by searching the name on ETSU website.
Do You Need More Support? |
Dynamic Forms Request Form |
-
ABOUT DYNAMIC FORMS!
ETSU has partnered with NextGen Web Solution to provide the ETSU community with a tool for creating digital forms. Their product Dynamic Forms is a cloud-based forms system that provides a simple, effective way for end users to create web-based forms for data collection and electronic signatures.
* FULLY HOSTED, PROVEN SOLUTION: Dynamic Form has processed over 21 million higher education electronic forms over the past 12 years for all types and sizes of colleges.
* COMPLETE AND E-SIGN ANYTIME: Users are not limited by business hours to accomplish completing required forms—even forms requiring multiple electronic signatures in complex workflows and/or including payments.
* SIMPLE FORM CREATION: Non-technical users can customize, design and publish professional-looking forms without the need for programming knowledge.
* CONFIDENCE IN DATA: Prefilling form fields using single sign-on functionality not only ensures that the data is accurate, but it also provides a high level of confidence that the user completing and signing the form is indeed that person.
* E-COMMERCE SOLUTIONS: Use Dynamic Forms for donations, registrations, collections, enrollment confirmation, sales of merchandise, or whatever your payment needs are. We integrate with several payment vendors to provide these solutions across campus.
* USER PORTAL: Consolidate all of your Dynamic Forms in one place for your different user audiences. Users can be assigned specific forms (required with due dates) or see forms from any office on campus without search multiple places. The portal can be specific by User Type so students will not see faculty forms, etc.
Dynamic Forms Support Contact
SASAN AHOVAN
Technology Development Coordinator Academic Technology Services
- ahovan@etsu.edu
- 423-439-8247
- 118 Sherrod Library